Showing posts with label VB6. Show all posts

Thursday, September 29, 2016

HOW TO IMPLEMENT A LOGIN FORM IN VB6

Before anything else, I will assume that you have previous knowledge with regards to constructing basic SQL commands using MS Access. This tutorial will demonstrate how to create a login form in Visual Basic 6.0 using MS Access as database engine.

To get us started, we need to create a new table to our database. Name it ‘Users’, with the following structure:
FIELD NAME
DATA TYPE
ATTRIBUTES
ID
AutoNumber

Username
Text
Field Size: 15
Password
Text
Field Size: 255 | Input Mask:*

The structure is pretty straight forward. The ID field is Auto Incremented and will serve as the Primary Key. The Username is of type Text with the length of 15 characters long. Finally, the Password field 255 in length.

It is time to populate the table. We are going to start with two users only for this tutorial. Insert the following records:
ID
Username
Password
1
alex
Kulot01@
2
john
Whitewolf69

Now our table is ready. We only have two authorized login credentials which of Alex and John with their corresponding password.

Next, we will design our login form in VB6 IDE. Create a form with similar objects in it as shown below:


Form Layout

Control
Property
Value
Form
Name
Caption
BorderStyle
Height
Width
Form1
Login
1 – Fixed Single
3135
4845
Label1
Caption
User:
Label2
Caption
Password:
Text1
Name
Text
txtUser
Text2
Name
Text
PasswordChar
txtPassword

*
Command1
Name
Caption
cmdCancel
Cancel
Command2
Name
Caption
cmdLogin
Login
Controls, Properties and Values Matrix

Source Code
Form1.frm

Option Explicit

Private Sub cmdCancel_Click()   
    Unload Me
End Sub

Private Sub cmdLogin_Click()
    Dim rs As New Recordset
    Dim user As String
    Dim password As String
    Dim sql As String
   
    user = txtUser.Text
    password = txtPassword.Text
   
    sql = "SELECT * FROM Users WHERE Username = '" & user & "'"
    Debug.Print sql
    rs.Open sql, con, adOpenDynamic, adLockOptimistic
   
   
    If rs.State Then
        While Not rs.EOF
            If rs!password = password Then
                   
                'Load your main form because the access has been authorized
                Unload Me
                Exit Sub
            End If
           
            rs.MoveNext
        Wend
    End If
   
    MsgBox "Invalid Username or Password!", vbExclamation, "Authentication"
   
    rs.Close
    Set rs = Nothing
End Sub


NOTE: Upon running the application, the first form to load should be the Login form.

Wednesday, September 24, 2014

Creating Printable Reports Using Data Environment and Data Report

Welcome to another tutorial! This time you will learn how to create simple printable reports in VB6 and MS Access using Data Environment and Data Report. Again, I would like to stress out that the approach that I am going to user is a simple one.

To start with, I will assume that you have the latest copy of our project, open it and add a Data Environment. How? Follow the steps below: 
  • Go to your project window and right click on Project1.
  • Select Add then Data Environment.
  • You will be prompted with a DataEnvironment window. Within it, by default, you will see DataEnvironment1 and Connection1 objects.
  • Right click on Connection1 and select Properties.


  • A Data Link Properties Window pops-up. Under Provider tab, select Microsoft Jet 4.0 OLE DB Provider and click Next button.

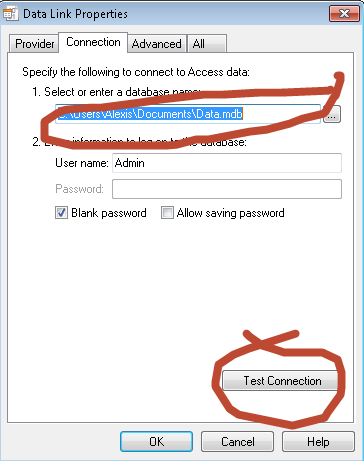
  • Right now, Connection tab is the default tab. From there, point the DataEnvironment to your database. In short, browse for your database.


  • Once done, click the Test Connection button to test the connection.
  • If executed properly, you will get a msgbox saying “Test connection succeeded”.
At this point, we have successfully established a connection to our database. The next series of steps is for the creation of Commands. We use Commands to execute SQL command via Data Environment. Follow the steps below:

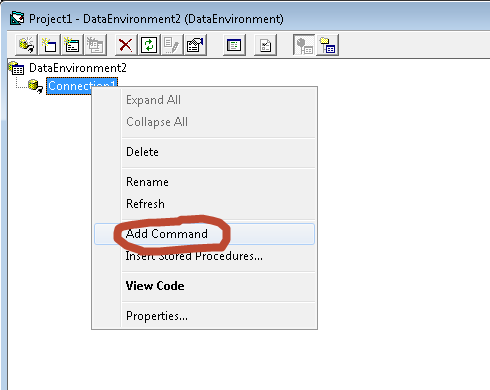
  • ight click on Connection1 and select Add Command.
     
  • A new command will be created, if this is your first command, its default name is Command1.
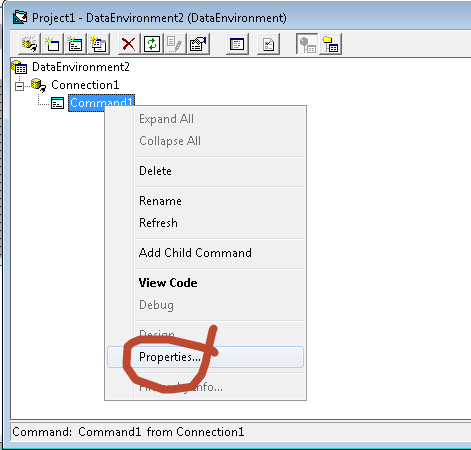
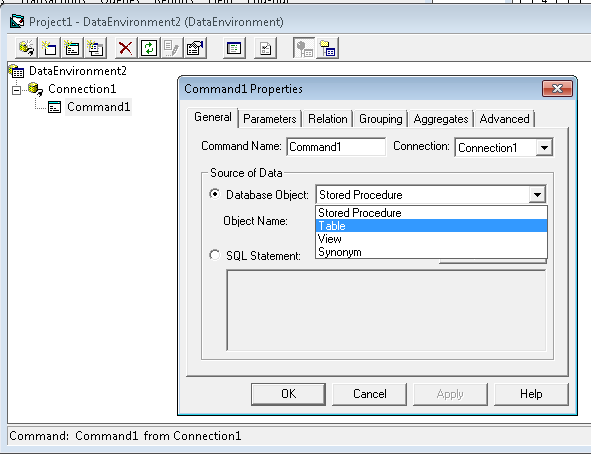
  • Right click on the newly created command and select Properties.

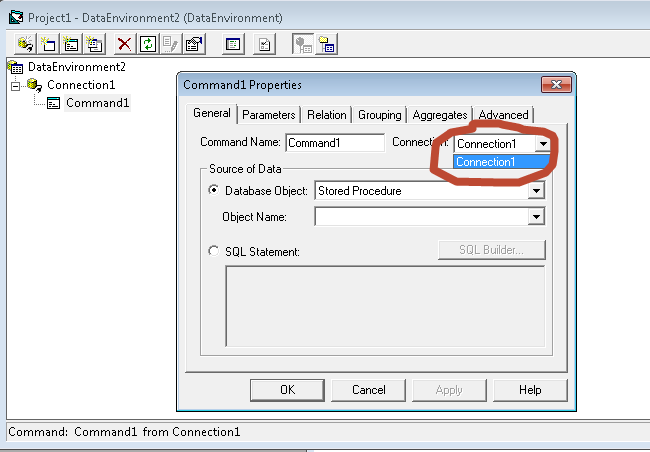
  • Command1 Properties window will popup. Under General tab toggle Connection box and select our newly created connection Connection1.

  • Next, set the Database Object to Table and select an Object Name from the list (Student or Vendor).

  • Finally, click OK.
Now we have successfully setup the DataEnvironment (the source of data for our report). It is time to create the actual report page. 

  • Add a Data Report to your Project. How? Right click on Project1 in you Properties window and select Data Report.
  • A new Data Report form will be created. Set its DataSource property to 'Connection1' and  DataMember to 'Command1'.
  • If you are experiencing any problems related to the connection at this point, you might want to re-visit the steps above.
Considering you have flawlessly executed the instructions, you are now ready to add data fields to your report form. To do this, just simply drag and drop any fields that you want to appear to your report (Data Report) from the Commands in your Data Environment. Finally, format your report according to your requirements.


Here comes the coding part. Remember recently we have added Report menu to our MDIForm? We are going to invoke the report using Studentlist item. Go to the Click event procedure of Studentlist and paste the following source code:

       DataReport1.Show

Run the application and test the report.

For Viral Stuff and Trending News, visit http://www.fooviral.com.

Wednesday, September 10, 2014

How to Detect Unload-Event Source in VB6

Occurs before a form or application closes. When an MDIForm object closes, the QueryUnload event occurs first for the MDI form and then in all MDI child forms. If no form cancels the QueryUnload event, the Unload event occurs first in all other forms and then in an MDI form. When a child form or a Form object closes, the QueryUnload event in that form occurs before the form's Unload event.

Syntax
Private Sub Form_QueryUnload(cancel As Integer, unloadmode As Integer)
Private Sub MDIForm_QueryUnload(cancel As Integer, unloadmode As Integer)
The QueryUnload event syntax has these parts:
e QueryUnload event syntax has these parts:
PartDescription
cancelAn integer. Setting this argument to any value other than 0 stops the QueryUnload event in all loaded forms and stops the form and application from closing.
unloadmodeA value or constant indicating the cause of the QueryUnload event, as described in Return Values.


Return Values
The unloadmode argument returns the following values:
ConstantValueDescription
vbFormControlMenu0The user chose the Close command from the Control menu on the form.
vbFormCode1The Unload statement is invoked from code.
vbAppWindows2The current Microsoft Windows operating environment session is ending.
vbAppTaskManager3The Microsoft Windows Task Manager is closing the application.
vbFormMDIForm4An MDI child form is closing because the MDI form is closing.
vbFormOwner5A form is closing because its owner is closing.

Example:
Private Sub Form_QueryUnload(Cancel As Integer, UnloadMode As Integer)
    If UnloadMode = 0 Then  'X button was clicked
        End
    End If
End Sub

Multiple Document Interface


The Multiple Document Interface (MDI) was designed to simplify the exchange of information among documents, all under the same roof. 

With the main application, you can maintain multiple open windows, but not multiple copies of the application. Data exchange is easier when you can view and compare many documents simultaneously.

An MDI application must have at least two Forms, the parent Form and one or more child Forms. Each of these Forms has certain properties. There can be many child forms contained within the parent Form, but there can be only one parent Form. The parent Form may not contain any controls. While the parent Form is open in design mode, the icons on the ToolBox are not displayed, but you can't place any controls on the Form. The parent Form can, and usually has its own menu.

To create an MDI application, follow these steps:

  1. Start a new project and then choose Project >>> Add MDI Form to add the parent Form.
  2. Set the Form's caption to MDI Window
  3. Choose Project >>> Add Form to add a SDI Form.
  4. Make this Form as child of MDI Form by setting the MDI Child property of the SDI Form to True. Set the caption property to MDI Child window.

Tuesday, September 9, 2014

How to Create a Simple Login Form in VB6 Using MS Access Database


In every database system, a very important function which contributes to the security of the application is the login form. Using a login facility, we can filter or prevent the unauthorized access to our application.

In this simple tutorial you will learn how to create a dynamic login form using VB6 and Microsoft Access Database. For connectivity, we will be using Microsoft ADO. I will assume that you already have your MS Access database, if not start a new database. Follow the schema of our ‘user’ table below: 

Table Name: user 
Field Name                       Data Type                          Attribute                             Value 
username                           Text                                       Field Size                           15
password                           Text                                       Field Size                            8
fullname                              Text                                       Field Size                           100

Next step would be the adding of new form to your Project. Please see description below:

Graphical User Interface

Controls and their Attributes 

Label     Control Type                                      Attribute                       Value 
1            TextBox                                            Name                              txtUser
2            TextBox                                            Name                              txtPasswd
                                                                        PasswordChar              *
3             Adodc                                             Name                              Adodc1
                                                                        CommandType              1 – adCmdText
                                                                        RecordSource               SELECT * FROM User
4              CommandButton                          Name                              cmdLogin
5              Label                                             Caption                           User name:
6              Label                                             Caption                           Password:

Next, let us setup your connection using Adodc control. Please follow the steps below: 

  1. Right click on your Adodc1 control.
  2. Select ADODC Properties.  
  3. Toggle ‘Use Connection String’ option box and click Build.  
  4. Under Connection tab,  type or browse your MS Access database  and set the credential if there is any, otherwise leave the credential box as is.  
  5. Finally, check your connection by clicking Test Connection button. If you have successfully set the connection, you will receive a message box saying “Test Connection Succeeded.”.  
  6. Click OK. 
  7. Lastly, simply copy and paste the code below to your code window:


Source Code: 

Private Sub cmdLogin_Click()
    Dim user As String
    Dim passwd As String
    Dim result As Integer
    Dim sql As String

    user = txtUser.Text     'fetch the username from the box

    passwd = txtPasswd.Text 'fetch the password from the box

    'sql query below

    sql = "SELECT User.username, User.password, User.fullname " _

    & "From [user] " _

    & "WHERE (((User.username)='" & user & "') AND " _

    & "((User.password)='" & passwd & "'))"


    Adodc1.RecordSource = sql   'run query

    Adodc1.Refresh  'refresh recordset


    result = Adodc1.Recordset.RecordCount   'count the number of query result


    If result > 0 Then 'if result is greater than zero, it means that the user is valid


        Unload Me   'unload login form

    Else

        MsgBox "User name or password is incorrect!", vbExclamation

    End If


End Sub


Private Sub Form_QueryUnload(Cancel As Integer, UnloadMode As Integer)

    If UnloadMode = 0 Then  'X button was clicked

        End

    End If

End Sub