Showing posts with label MS Access. Show all posts

Wednesday, September 24, 2014

Creating Printable Reports Using Data Environment and Data Report

Welcome to another tutorial! This time you will learn how to create simple printable reports in VB6 and MS Access using Data Environment and Data Report. Again, I would like to stress out that the approach that I am going to user is a simple one.

To start with, I will assume that you have the latest copy of our project, open it and add a Data Environment. How? Follow the steps below: 
  • Go to your project window and right click on Project1.
  • Select Add then Data Environment.
  • You will be prompted with a DataEnvironment window. Within it, by default, you will see DataEnvironment1 and Connection1 objects.
  • Right click on Connection1 and select Properties.


  • A Data Link Properties Window pops-up. Under Provider tab, select Microsoft Jet 4.0 OLE DB Provider and click Next button.

  • Right now, Connection tab is the default tab. From there, point the DataEnvironment to your database. In short, browse for your database.
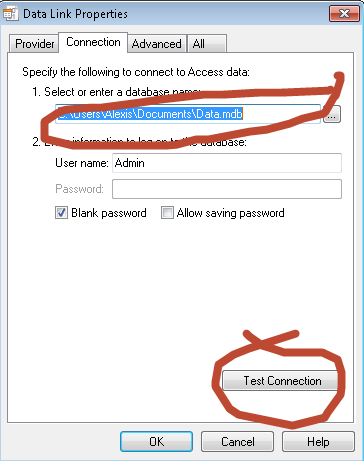

  • Once done, click the Test Connection button to test the connection.
  • If executed properly, you will get a msgbox saying “Test connection succeeded”.
At this point, we have successfully established a connection to our database. The next series of steps is for the creation of Commands. We use Commands to execute SQL command via Data Environment. Follow the steps below:

  • ight click on Connection1 and select Add Command.
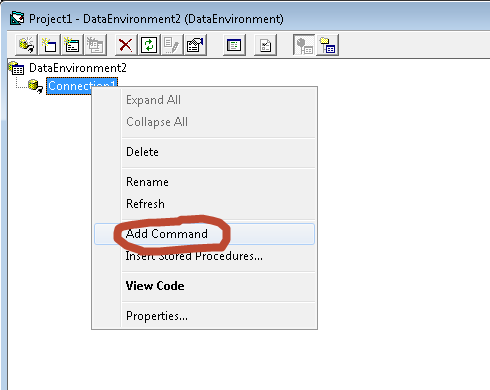
     
  • A new command will be created, if this is your first command, its default name is Command1.
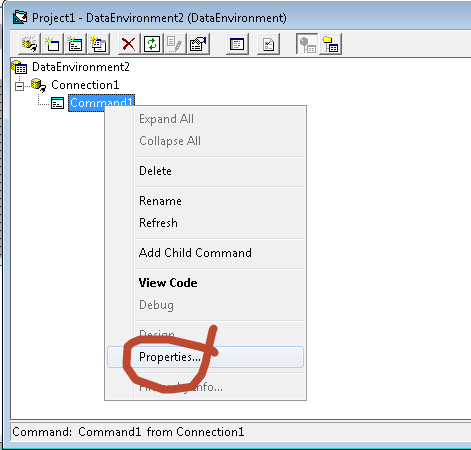
  • Right click on the newly created command and select Properties.
  • Command1 Properties window will popup. Under General tab toggle Connection box and select our newly created connection Connection1.
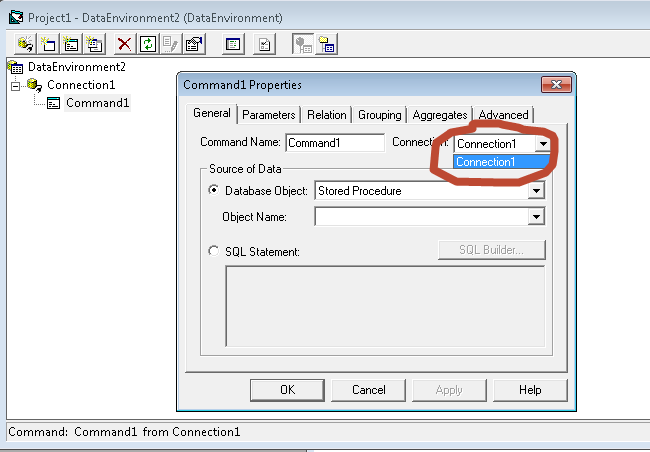
  • Next, set the Database Object to Table and select an Object Name from the list (Student or Vendor).
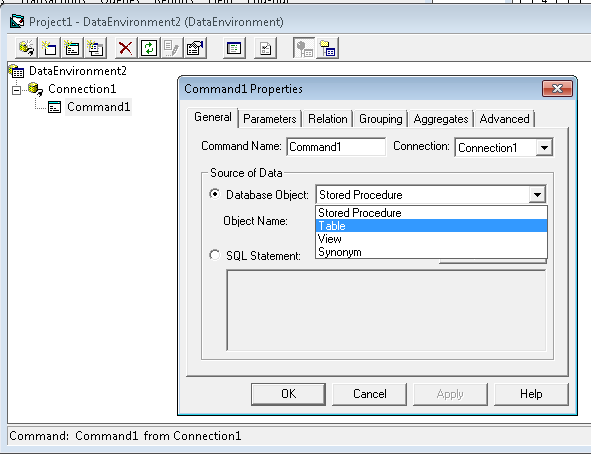
  • Finally, click OK.
Now we have successfully setup the DataEnvironment (the source of data for our report). It is time to create the actual report page. 

  • Add a Data Report to your Project. How? Right click on Project1 in you Properties window and select Data Report.
  • A new Data Report form will be created. Set its DataSource property to 'Connection1' and  DataMember to 'Command1'.
  • If you are experiencing any problems related to the connection at this point, you might want to re-visit the steps above.
Considering you have flawlessly executed the instructions, you are now ready to add data fields to your report form. To do this, just simply drag and drop any fields that you want to appear to your report (Data Report) from the Commands in your Data Environment. Finally, format your report according to your requirements.


Here comes the coding part. Remember recently we have added Report menu to our MDIForm? We are going to invoke the report using Studentlist item. Go to the Click event procedure of Studentlist and paste the following source code:

       DataReport1.Show

Run the application and test the report.

For Viral Stuff and Trending News, visit http://www.fooviral.com.

Wednesday, September 17, 2014

How To Implement A Simple System User Level In VB6 and MS Access (The Cool Dude Way)

In an organization or company, each employee has certain access level to company's sensitive information. The company keeps an organizational chart which enforce the hierarchy of employee and their current  position. This will enable us to determine which user has access to which part of the system. Since we already have our login facility added to our fancy Project, we will now implement the System User Level.

The login form will simply filter valid users to the system. But once valid users are in, we still need to implement further security check. The main purpose of the SUL is to limit the access of those valid users to the modules or elements of our system.

Note: "This tutorial will just introduce a simple (lame) approach on how to implement SUL. However, I encourage you to come up with your own method or approach, a kick-ass one. Once again, use some logic."

We will jump-start by expanding our menu list, follow the structure below:

Masterfiles
  • Manage Student
  • Manage Subject
 Transactions
  • Enroll
  • Grade Entry
Queries
  • Search Student
Reports
  • Student list
  • Student Grade
Help
  • About
Log-out


For this tutorial, we will assume that there are three types of user: Administrator, Teacher and Encoder.
Below are their user levels:

Administrator - Overall access
Teacher - Can only access Grade Entry, Search Student, Student list and Student Grade
Encoder - Can only Manage Student and Manage Subject

Now we are ready to edit the database. We need to add another field to the 'User' table, see illustration below:

Table: User
Field Name               Data Type         Attribute           Value
username                  Text                    Field Size          15
password                  Text                    Field Size           8
fullname                   Text                    Field Size          100
usrlevel                    Number             Field Size          Byte

The next step is not very impressive, but it will work for now. For the sake of simplicity (but lame) we will device a picture box and a label control to hold our user's user level variable. Add a picture box to your MDIForm. Inside the picturebox, draw a label and name it 'lblUserLevel'.

At this point, we are now ready to write some code. Copy and paste the snippet below to your login form. The exact place on where to put the code is for you to figure out. Use some logic lads.

        MDIForm1.lblUserLevel.Caption =Adodc1.Recordset.Fields("usrlevel")       
        Dim lvl As Integer   


        lvl = MDIForm1.lblUserLevel.Caption
    
        If lvl = 1 Then

            'The following block was written by Miss Mendoza
            MDIForm1.muTransGradeEntry.Enabled = True
            MDIForm1.mnuQSearchStud.Enabled = True
            MDIForm1.mnuRepStudlist.Enabled = True
           
            MDIForm1.mnuStudForm.Enabled = True
            MDIForm1.mnuSubjForm.Enabled = True
           
            MDIForm1.mnuTransEnroll.Enabled = True
            MDIForm1.mnuRepStudGrade.Enabled = True
            MDIForm1.mnuHelpAbout.Enabled = True
            'End of Miss Mendoza's code


        ElseIf lvl = 2 Then

           
            MDIForm1.muTransGradeEntry.Enabled = True
            MDIForm1.mnuQSearchStud.Enabled = True
            MDIForm1.mnuRepStudlist.Enabled = True
           
            MDIForm1.mnuStudForm.Enabled = False
            MDIForm1.mnuSubjForm.Enabled = False
           
            MDIForm1.mnuTransEnroll.Enabled = False
            MDIForm1.mnuRepStudGrade.Enabled = False
            MDIForm1.mnuHelpAbout.Enabled = False
        

       'Code of Miss Lito   
        ElseIf lvl = 3 Then
            MDIForm1.mnuStudForm.Enabled = True
            MDIForm1.mnuSubjForm.Enabled = True           
           
            MDIForm1.mnuTransEnroll.Enabled = False
            MDIForm1.muTransGradeEntry.Enabled = False
            MDIForm1.mnuQSearchStud.Enabled = False
            MDIForm1.mnuRepStudlist.Enabled = False
            MDIForm1.mnuRepStudGrade.Enabled = False
            MDIForm1.mnuHelpAbout.Enabled = False
                         
           
        End If

        'End of Miss Lito's code 

For the logout module:

        lblUserLevel.Caption = ""
        frmLogin.Show 1

Finally, we have one thing left to do and that is to test the  program. Run the application and login using our user accounts.


Tuesday, September 9, 2014

How to Create a Simple Login Form in VB6 Using MS Access Database


In every database system, a very important function which contributes to the security of the application is the login form. Using a login facility, we can filter or prevent the unauthorized access to our application.

In this simple tutorial you will learn how to create a dynamic login form using VB6 and Microsoft Access Database. For connectivity, we will be using Microsoft ADO. I will assume that you already have your MS Access database, if not start a new database. Follow the schema of our ‘user’ table below: 

Table Name: user 
Field Name                       Data Type                          Attribute                             Value 
username                           Text                                       Field Size                           15
password                           Text                                       Field Size                            8
fullname                              Text                                       Field Size                           100

Next step would be the adding of new form to your Project. Please see description below:

Graphical User Interface

Controls and their Attributes 

Label     Control Type                                      Attribute                       Value 
1            TextBox                                            Name                              txtUser
2            TextBox                                            Name                              txtPasswd
                                                                        PasswordChar              *
3             Adodc                                             Name                              Adodc1
                                                                        CommandType              1 – adCmdText
                                                                        RecordSource               SELECT * FROM User
4              CommandButton                          Name                              cmdLogin
5              Label                                             Caption                           User name:
6              Label                                             Caption                           Password:

Next, let us setup your connection using Adodc control. Please follow the steps below: 

  1. Right click on your Adodc1 control.
  2. Select ADODC Properties.  
  3. Toggle ‘Use Connection String’ option box and click Build.  
  4. Under Connection tab,  type or browse your MS Access database  and set the credential if there is any, otherwise leave the credential box as is.  
  5. Finally, check your connection by clicking Test Connection button. If you have successfully set the connection, you will receive a message box saying “Test Connection Succeeded.”.  
  6. Click OK. 
  7. Lastly, simply copy and paste the code below to your code window:


Source Code: 

Private Sub cmdLogin_Click()
    Dim user As String
    Dim passwd As String
    Dim result As Integer
    Dim sql As String

    user = txtUser.Text     'fetch the username from the box

    passwd = txtPasswd.Text 'fetch the password from the box

    'sql query below

    sql = "SELECT User.username, User.password, User.fullname " _

    & "From [user] " _

    & "WHERE (((User.username)='" & user & "') AND " _

    & "((User.password)='" & passwd & "'))"


    Adodc1.RecordSource = sql   'run query

    Adodc1.Refresh  'refresh recordset


    result = Adodc1.Recordset.RecordCount   'count the number of query result


    If result > 0 Then 'if result is greater than zero, it means that the user is valid


        Unload Me   'unload login form

    Else

        MsgBox "User name or password is incorrect!", vbExclamation

    End If


End Sub


Private Sub Form_QueryUnload(Cancel As Integer, UnloadMode As Integer)

    If UnloadMode = 0 Then  'X button was clicked

        End

    End If

End Sub