Write a C++ program that will display the calculator menu.
The program will prompt the user to choose the operation choice (from 1 to 5). Then it should ask the user to input two integer values
for the calculation.
See the sample below.
MENU
1. Add
2. Subtract
3. Multiply
4. Divide
5. Modulus
Enter your choice: 1
Enter your two numbers: 12 15
Result: 27
Continue? y
The program also asks the user to decide whether he/she wants to continue the operation. If he/she input ‘y’, the program will prompt
the user to choose the operation gain. Otherwise, the program will terminate.
Tuesday, December 9, 2014
Wednesday, November 26, 2014
COMPRO8 Activity #4
Things That Needs To Be Done Today
Study PHP Arrays in http://www.w3schools.com/php/php_arrays.asp
Activity #4
Problem:
Write a Web App to accept a string input (sentence) using a <textarea> element. During form submission, store each word of the sentence in an array named $words[].
Sample Output:
Web Interface
Result: Each word will be stored as element in the array.
words
Study PHP Arrays in http://www.w3schools.com/php/php_arrays.asp
Activity #4
Problem:
Write a Web App to accept a string input (sentence) using a <textarea> element. During form submission, store each word of the sentence in an array named $words[].
Sample Output:
Web Interface
Enter a sentence:
Result: Each word will be stored as element in the array.
words
| What | did | the | fox | say? | Ting | ting | ting | ting... |
Tuesday, September 30, 2014
Review - Activity #1
Sept 30, 2014
COMPRO2 - Excellence and Integrity
Problem #1
Write a program to compute the salary of an employee using the formula : salary=hours worked X hourly rate. Require an input for hours worked and hourly rate using the keyboard.
Sample output:
Enter hours worked: 20
Enter hourly rate: 70.50
Salary: 1410.0
Problem #2
Write a program to accept the gender of a person; 'M' for male and 'F' for female. Display an appropriate message based on gender.
Sample output:
Validation #1:
What is your gender? M
Good morning Sir!
Validation #2:
What is your gender? F
Good morning Ma'am!
Validation #3:
What is your gender? Male
Invalid gender!
SEND YOUR SOURCE CODE TO: adichosa@gmail.com
SUBJECT: <section>-COMPRO2-LACARLOTA-<fullname>
Monday, September 29, 2014

Wednesday, September 24, 2014
Creating Printable Reports Using Data Environment and Data Report
Welcome to another tutorial! This time you will learn how to
create simple printable reports in VB6 and MS Access using Data Environment and
Data Report. Again, I would like to stress out that the approach that I am going to user is a simple
one.
To start with, I will assume that you have the latest copy
of our project, open it and add a
Data Environment. How? Follow the steps below:
- Go to your project window and right click on Project1.
- Select Add then Data Environment.
- You will be prompted with a DataEnvironment window. Within it, by default, you will see DataEnvironment1 and Connection1 objects.
- Right click on Connection1 and select Properties.

- A Data Link Properties Window pops-up. Under Provider tab, select Microsoft Jet 4.0 OLE DB Provider and click Next button.

- Right now, Connection tab is the default tab. From there, point the DataEnvironment to your database. In short, browse for your database.
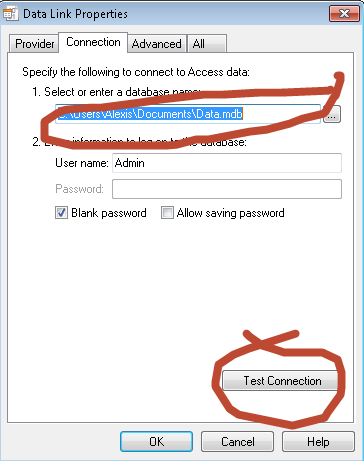
- Once done, click the Test Connection button to test the connection.
- If executed properly, you will get a msgbox saying “Test connection succeeded”.
- ight click on Connection1 and select Add Command.
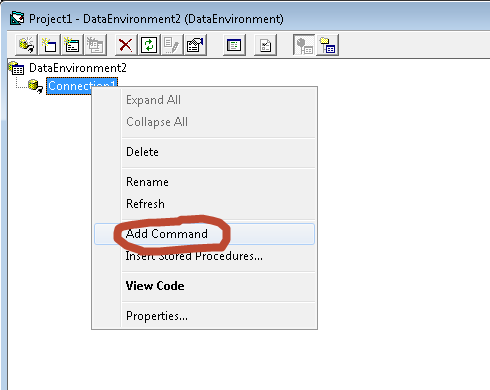
- A new command will be created, if this is your first command, its default name is Command1.
- Right click on the newly created command and select Properties.
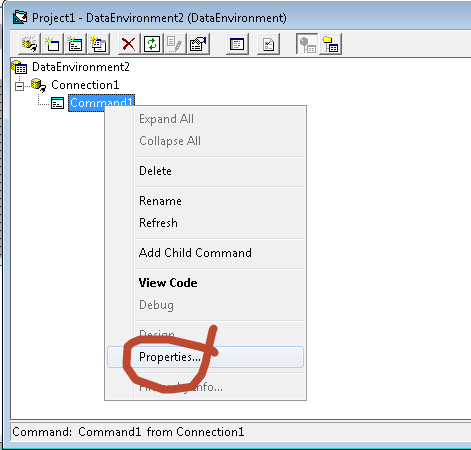
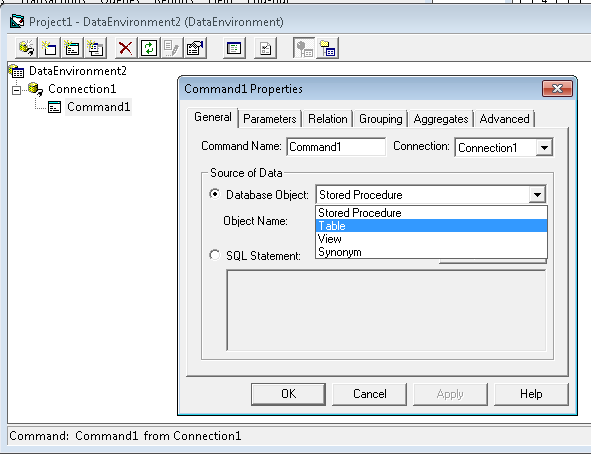
- Command1 Properties window will popup. Under General tab toggle Connection box and select our newly created connection Connection1.
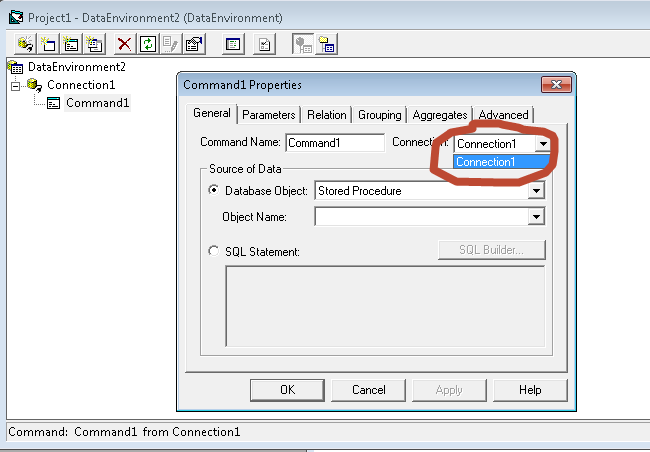
- Next, set the Database Object to Table and select an Object Name from the list (Student or Vendor).
- Finally, click OK.
- Add a Data Report to your Project. How? Right click on Project1 in you Properties window and select Data Report.
- A new Data Report form will be created. Set its DataSource property to 'Connection1' and DataMember to 'Command1'.
- If you are experiencing any problems related to the connection at this point, you might want to re-visit the steps above.
Considering you have flawlessly executed the instructions, you are now ready to add data fields to your report form. To do this, just simply drag and drop any fields that you want to appear to your report (Data Report) from the Commands in your Data Environment. Finally, format your report according to your requirements.

Here comes the coding part. Remember recently we have added Report menu to our MDIForm? We are going to invoke the report using Studentlist item. Go to the Click event procedure of Studentlist and paste the following source code:
DataReport1.Show
Run the application and test the report.
For Viral Stuff and Trending News, visit http://www.fooviral.com.
Wednesday, September 17, 2014
How To Implement A Simple System User Level In VB6 and MS Access (The Cool Dude Way)
In an organization or company, each employee has certain access level to company's sensitive information. The company keeps an organizational chart which enforce the hierarchy of employee and their current position. This will enable us to determine which user has access to which part of the system. Since we already have our login facility added to our fancy Project, we will now implement the System User Level.
The login form will simply filter valid users to the system. But once valid users are in, we still need to implement further security check. The main purpose of the SUL is to limit the access of those valid users to the modules or elements of our system.
Note: "This tutorial will just introduce a simple (lame) approach on how to implement SUL. However, I encourage you to come up with your own method or approach, a kick-ass one. Once again, use some logic."
We will jump-start by expanding our menu list, follow the structure below:
Masterfiles
For this tutorial, we will assume that there are three types of user: Administrator, Teacher and Encoder.
Below are their user levels:
Administrator - Overall access
Teacher - Can only access Grade Entry, Search Student, Student list and Student Grade
Encoder - Can only Manage Student and Manage Subject
Now we are ready to edit the database. We need to add another field to the 'User' table, see illustration below:
Table: User
Field Name Data Type Attribute Value
username Text Field Size 15
password Text Field Size 8
fullname Text Field Size 100
usrlevel Number Field Size Byte
The next step is not very impressive, but it will work for now. For the sake of simplicity (but lame) we will device a picture box and a label control to hold our user's user level variable. Add a picture box to your MDIForm. Inside the picturebox, draw a label and name it 'lblUserLevel'.
At this point, we are now ready to write some code. Copy and paste the snippet below to your login form. The exact place on where to put the code is for you to figure out. Use some logic lads.
MDIForm1.lblUserLevel.Caption =Adodc1.Recordset.Fields("usrlevel")
Dim lvl As Integer
lvl = MDIForm1.lblUserLevel.Caption
If lvl = 1 Then
'The following block was written by Miss Mendoza
MDIForm1.muTransGradeEntry.Enabled = True
MDIForm1.mnuQSearchStud.Enabled = True
MDIForm1.mnuRepStudlist.Enabled = True
MDIForm1.mnuStudForm.Enabled = True
MDIForm1.mnuSubjForm.Enabled = True
MDIForm1.mnuTransEnroll.Enabled = True
MDIForm1.mnuRepStudGrade.Enabled = True
MDIForm1.mnuHelpAbout.Enabled = True
'End of Miss Mendoza's code
ElseIf lvl = 2 Then
MDIForm1.muTransGradeEntry.Enabled = True
MDIForm1.mnuQSearchStud.Enabled = True
MDIForm1.mnuRepStudlist.Enabled = True
MDIForm1.mnuStudForm.Enabled = False
MDIForm1.mnuSubjForm.Enabled = False
MDIForm1.mnuTransEnroll.Enabled = False
MDIForm1.mnuRepStudGrade.Enabled = False
MDIForm1.mnuHelpAbout.Enabled = False
'Code of Miss Lito
ElseIf lvl = 3 Then
MDIForm1.mnuStudForm.Enabled = True
MDIForm1.mnuSubjForm.Enabled = True
MDIForm1.mnuTransEnroll.Enabled = False
MDIForm1.muTransGradeEntry.Enabled = False
MDIForm1.mnuQSearchStud.Enabled = False
MDIForm1.mnuRepStudlist.Enabled = False
MDIForm1.mnuRepStudGrade.Enabled = False
MDIForm1.mnuHelpAbout.Enabled = False
End If
'End of Miss Lito's code
For the logout module:
lblUserLevel.Caption = ""
frmLogin.Show 1
Finally, we have one thing left to do and that is to test the program. Run the application and login using our user accounts.
The login form will simply filter valid users to the system. But once valid users are in, we still need to implement further security check. The main purpose of the SUL is to limit the access of those valid users to the modules or elements of our system.
Note: "This tutorial will just introduce a simple (lame) approach on how to implement SUL. However, I encourage you to come up with your own method or approach, a kick-ass one. Once again, use some logic."
We will jump-start by expanding our menu list, follow the structure below:
Masterfiles
- Manage Student
- Manage Subject
- Enroll
- Grade Entry
- Search Student
- Student list
- Student Grade
- About
For this tutorial, we will assume that there are three types of user: Administrator, Teacher and Encoder.
Below are their user levels:
Administrator - Overall access
Teacher - Can only access Grade Entry, Search Student, Student list and Student Grade
Encoder - Can only Manage Student and Manage Subject
Now we are ready to edit the database. We need to add another field to the 'User' table, see illustration below:
Table: User
Field Name Data Type Attribute Value
username Text Field Size 15
password Text Field Size 8
fullname Text Field Size 100
usrlevel Number Field Size Byte
The next step is not very impressive, but it will work for now. For the sake of simplicity (but lame) we will device a picture box and a label control to hold our user's user level variable. Add a picture box to your MDIForm. Inside the picturebox, draw a label and name it 'lblUserLevel'.
At this point, we are now ready to write some code. Copy and paste the snippet below to your login form. The exact place on where to put the code is for you to figure out. Use some logic lads.
MDIForm1.lblUserLevel.Caption =Adodc1.Recordset.Fields("usrlevel")
Dim lvl As Integer
lvl = MDIForm1.lblUserLevel.Caption
If lvl = 1 Then
'The following block was written by Miss Mendoza
MDIForm1.muTransGradeEntry.Enabled = True
MDIForm1.mnuQSearchStud.Enabled = True
MDIForm1.mnuRepStudlist.Enabled = True
MDIForm1.mnuStudForm.Enabled = True
MDIForm1.mnuSubjForm.Enabled = True
MDIForm1.mnuTransEnroll.Enabled = True
MDIForm1.mnuRepStudGrade.Enabled = True
MDIForm1.mnuHelpAbout.Enabled = True
'End of Miss Mendoza's code
ElseIf lvl = 2 Then
MDIForm1.muTransGradeEntry.Enabled = True
MDIForm1.mnuQSearchStud.Enabled = True
MDIForm1.mnuRepStudlist.Enabled = True
MDIForm1.mnuStudForm.Enabled = False
MDIForm1.mnuSubjForm.Enabled = False
MDIForm1.mnuTransEnroll.Enabled = False
MDIForm1.mnuRepStudGrade.Enabled = False
MDIForm1.mnuHelpAbout.Enabled = False
'Code of Miss Lito
ElseIf lvl = 3 Then
MDIForm1.mnuStudForm.Enabled = True
MDIForm1.mnuSubjForm.Enabled = True
MDIForm1.mnuTransEnroll.Enabled = False
MDIForm1.muTransGradeEntry.Enabled = False
MDIForm1.mnuQSearchStud.Enabled = False
MDIForm1.mnuRepStudlist.Enabled = False
MDIForm1.mnuRepStudGrade.Enabled = False
MDIForm1.mnuHelpAbout.Enabled = False
End If
'End of Miss Lito's code
For the logout module:
lblUserLevel.Caption = ""
frmLogin.Show 1
Finally, we have one thing left to do and that is to test the program. Run the application and login using our user accounts.
Tuesday, September 16, 2014
Terms to Remember
Tokens in C++ every programmer should know
Prepare for a quiz next meeting.
- Identifier
- Keywords
- Constant
- Operators
Prepare for a quiz next meeting.
Sunday, September 14, 2014
Big Starts From Small
“The best programs are written so that computing machines can perform them quickly and so that human beings can understand them clearly. A programmer is ideally an essayist who works with traditional aesthetic and literary forms as well as mathematical concepts, to communicate the way that an algorithm works and to convince a reader that the results will be correct.”
― Donald Ervin Knuth, Selected Papers on Computer Science
― Donald Ervin Knuth, Selected Papers on Computer Science
Thursday, September 11, 2014
Variables and Data Types
Viral Stuff and Trending News
Obviously, this is a very simple example, since we have only used two small integer values, but consider that your computer can store millions of numbers like these at the same time and conduct sophisticated mathematical operations with them.
Here is the complete list of fundamental types in C++:
* The names of certain integer types can be abbreviated without their signed and int components - only the part not in italics is required to identify the type, the part in italics is optional. I.e., signed short int can be abbreviated as signed short, short int, or simply short; they all identify the same fundamental type.
Within each of the groups above, the difference between types is only their size (i.e., how much they occupy in memory): the first type in each group is the smallest, and the last is the largest, with each type being at least as large as the one preceding it in the same group. Other than that, the types in a group have the same properties.
Note in the panel above that other than char (which has a size of exactly one byte), none of the fundamental types has a standard size specified (but a minimum size, at most). Therefore, the type is not required (and in many cases is not) exactly this minimum size. This does not mean that these types are of an undetermined size, but that there is no standard size across all compilers and machines; each compiler implementation may specify the sizes for these types that fit the best the architecture where the program is going to run. This rather generic size specification for types gives the C++ language a lot of flexibility to be adapted to work optimally in all kinds of platforms, both present and future.
Type sizes above are expressed in bits; the more bits a type has, the more distinct values it can represent, but at the same time, also consumes more space in memory:
For integer types, having more representable values means that the range of values they can represent is greater; for example, a 16-bit unsigned integer would be able to represent 65536 distinct values in the range 0 to 65535, while its signed counterpart would be able to represent, on most cases, values between -32768 and 32767. Note that the range of positive values is approximately halved in signed types compared to unsigned types, due to the fact that one of the 16 bits is used for the sign; this is a relatively modest difference in range, and seldom justifies the use of unsigned types based purely on the range of positive values they can represent.
To see what variable declarations look like in action within a program, let's have a look at the entire C++ code of the example about your mental memory proposed at the beginning of this chapter:
Don't be worried if something else than the variable declarations themselves look a bit strange to you. Most of it will be explained in more detail in coming chapters.
A second method, known as constructor initialization (introduced by the C++ language), encloses the initial value between parentheses (()):
Finally, a third method, known as uniform initialization, similar to the above, but using curly braces ({}) instead of parentheses (this was introduced by the revision of the C++ standard, in 2011):
All three ways of initializing variables are valid and equivalent in C++.
The usefulness of the "Hello World" programs shown
in the previous chapter is rather questionable. We had to write several lines
of code, compile them, and then execute the resulting program, just to obtain
the result of a simple sentence written on the screen. It certainly would have
been much faster to type the output sentence ourselves.
However, programming is not limited only to printing simple
texts on the screen. In order to go a little further on and to become able to
write programs that perform useful tasks that really save us work, we need to
introduce the concept of variable.
Let's imagine that I ask you to remember the number 5, and
then I ask you to also memorize the number 2 at the same time. You have just
stored two different values in your memory (5 and 2). Now, if I ask you to add
1 to the first number I said, you should be retaining the numbers 6 (that is
5+1) and 2 in your memory. Then we could, for example, subtract these values
and obtain 4 as result.
The whole process described above is a simile of what a
computer can do with two variables. The same process can be expressed in C++
with the following set of statements:
a = 5;
b = 2;
a = a + 1;
result = a - b;
|
Obviously, this is a very simple example, since we have only used two small integer values, but consider that your computer can store millions of numbers like these at the same time and conduct sophisticated mathematical operations with them.
We can now define variable as
a portion of memory to store a value.
Each variable needs a name that
identifies it and distinguishes it from the others. For example, in the
previous code the variable names were a, b, and result, but we could have called the
variables any names we could have come up with, as long as they were valid C++
identifiers.
Identifiers
A valid identifier is a
sequence of one or more letters, digits, or underscore characters (_).
Spaces, punctuation marks, and symbols cannot be part of an identifier. In
addition, identifiers shall always begin with a letter. They can also begin
with an underline character (_), but such identifiers are -on most cases- considered
reserved for compiler-specific keywords or external identifiers, as well as
identifiers containing two successive underscore characters anywhere. In no
case can they begin with a digit.
C++ uses a number of keywords to identify operations and data descriptions; therefore, identifiers created by a programmer cannot match these keywords. The standard reserved keywords that cannot be used for programmer created identifiers are:
alignas, alignof, and, and_eq, asm, auto, bitand, bitor, bool, break, case, catch, char, char16_t, char32_t, class, compl, const, constexpr, const_cast, continue, decltype, default, delete, do, double, dynamic_cast, else, enum, explicit, export, extern, false, float, for, friend, goto, if, inline, int, long, mutable, namespace, new, noexcept, not, not_eq, nullptr, operator, or, or_eq, private, protected, public, register, reinterpret_cast, return, short, signed, sizeof, static, static_assert, static_cast, struct, switch, template, this, thread_local, throw, true, try, typedef, typeid, typename, union, unsigned, using, virtual, void, volatile, wchar_t, while, xor, xor_eq
Specific compilers may also have additional specific reserved keywords.
Very important: The C++ language is a "case sensitive" language. That means that an identifier written in capital letters is not equivalent to another one with the same name but written in small letters. Thus, for example, the RESULT variable is not the same as the result variable or the Result variable. These are three different identifiers identifiying three different variables.
Fundamental data types
The values of variables are stored
somewhere in an unspecified location in the computer memory as zeros and ones.
Our program does not need to know the exact location where a variable is
stored; it can simply refer to it by its name. What the program needs to be
aware of is the kind of data stored in the variable. It's not the same to store
a simple integer as it is to store a letter or a large floating-point number;
even though they are all represented using zeros and ones, they are not
interpreted in the same way, and in many cases, they don't occupy the same
amount of memory.
Fundamental data types are basic types implemented directly by the language that represent the basic storage units supported natively by most systems. They can mainly be classified into:
Fundamental data types are basic types implemented directly by the language that represent the basic storage units supported natively by most systems. They can mainly be classified into:
- Character types: They can represent a single character, such as 'A' or '$'. The most basic type is char, which is a one-byte character. Other types are also provided for wider characters.
- Numerical integer types: They can store a whole number value, such as 7 or 1024. They exist in a variety of sizes, and can either be signed or unsigned, depending on whether they support negative values or not.
- Floating-point types: They can represent real values, such as 3.14 or 0.01, with different levels of precision, depending on which of the three floating-point types is used.
- Boolean type: The boolean type, known in C++ as bool, can only represent one of two states, true or false.
Here is the complete list of fundamental types in C++:
Group
|
Type
names*
|
Notes
on size / precision
|
Character types
|
char
|
Exactly one byte in size. At least
8 bits.
|
char16_t
|
Not smaller than char.
At least 16 bits.
|
|
char32_t
|
Not smaller than char16_t. At least 32 bits.
|
|
wchar_t
|
Can represent the largest
supported character set.
|
|
Integer types (signed)
|
signed
char
|
Same size as char.
At least 8 bits.
|
signed short int
|
Not smaller than char.
At least 16 bits.
|
|
signed int
|
Not smaller than short. At least 16 bits.
|
|
signed long int
|
Not smaller than int.
At least 32 bits.
|
|
signed long long int
|
Not smaller than long.
At least 64 bits.
|
|
Integer types (unsigned)
|
unsigned
char
|
(same size as their signed
counterparts)
|
unsigned
short int
|
||
unsigned int
|
||
unsigned
long int
|
||
unsigned
long long int
|
||
Floating-point types
|
float
|
|
double
|
Precision not less than float
|
|
long
double
|
Precision not less than double
|
|
Boolean type
|
bool
|
|
Void type
|
void
|
no storage
|
Null pointer
|
decltype(nullptr)
|
* The names of certain integer types can be abbreviated without their signed and int components - only the part not in italics is required to identify the type, the part in italics is optional. I.e., signed short int can be abbreviated as signed short, short int, or simply short; they all identify the same fundamental type.
Within each of the groups above, the difference between types is only their size (i.e., how much they occupy in memory): the first type in each group is the smallest, and the last is the largest, with each type being at least as large as the one preceding it in the same group. Other than that, the types in a group have the same properties.
Note in the panel above that other than char (which has a size of exactly one byte), none of the fundamental types has a standard size specified (but a minimum size, at most). Therefore, the type is not required (and in many cases is not) exactly this minimum size. This does not mean that these types are of an undetermined size, but that there is no standard size across all compilers and machines; each compiler implementation may specify the sizes for these types that fit the best the architecture where the program is going to run. This rather generic size specification for types gives the C++ language a lot of flexibility to be adapted to work optimally in all kinds of platforms, both present and future.
Type sizes above are expressed in bits; the more bits a type has, the more distinct values it can represent, but at the same time, also consumes more space in memory:
Size
|
Unique
representable values
|
Notes
|
8-bit
|
256
|
= 28
|
16-bit
|
65 536
|
= 216
|
32-bit
|
4 294 967 296
|
= 232 (~4 billion)
|
64-bit
|
18 446 744 073 709
551 616
|
= 264 (~18 billion
billion)
|
For integer types, having more representable values means that the range of values they can represent is greater; for example, a 16-bit unsigned integer would be able to represent 65536 distinct values in the range 0 to 65535, while its signed counterpart would be able to represent, on most cases, values between -32768 and 32767. Note that the range of positive values is approximately halved in signed types compared to unsigned types, due to the fact that one of the 16 bits is used for the sign; this is a relatively modest difference in range, and seldom justifies the use of unsigned types based purely on the range of positive values they can represent.
For floating-point types, the size
affects their precision, by having more or less bits for their significant and
exponent.
If the size or precision of the type
is not a concern, then char, int, and double are typically selected to represent characters, integers,
and floating-point values, respectively. The other types in their respective
groups are only used in very particular cases.
The properties of fundamental types
in a particular system and compiler implementation can be obtained by using the
numeric_limits
classes (see standard header <limits>). If for some reason, types of specific sizes are needed,
the library defines certain fixed-size type aliases in header <cstdint>.
The types described above
(characters, integers, floating-point, and boolean) are collectively known as
arithmetic types. But two additional fundamental types exist: void,
which identifies the lack of type; and the type nullptr, which is
a special type of pointer. Both types will be discussed further in a coming
chapter about pointers.
C++ supports a wide variety of types
based on the fundamental types discussed above; these other types are known as compound
data types, and are one of the main strengths of the C++ language. We will
also see them in more detail in future chapters.
Declaration of variables
C++ is a strongly-typed language,
and requires every variable to be declared with its type before its first use.
This informs the compiler the size to reserve in memory for the variable and
how to interpret its value. The syntax to declare a new variable in C++ is
straightforward: we simply write the type followed by the variable name (i.e.,
its identifier). For example:
int
a;
float
mynumber;
|
These are two valid declarations of variables. The first one
declares a variable of type int with the identifier a. The second one declares a variable
of type float with the identifier mynumber. Once
declared, the variables a and mynumber can be used within the rest of their scope in the program.
If declaring more than one variable of the same type, they
can all be declared in a single statement by separating their identifiers with
commas. For example:
int
a, b, c;
|
This declares three variables (a,
b and c), all of them of type int, and has exactly the same meaning
as:
int
a;
int
b;
int
c;
|
To see what variable declarations look like in action within a program, let's have a look at the entire C++ code of the example about your mental memory proposed at the beginning of this chapter:
// operating with variables
#include <iostream>
using namespace std;
int
main ()
{
// declaring variables:
int a, b;
int result;
// process:
a = 5;
b = 2;
a = a + 1;
result = a - b;
// print out the result:
cout << result;
// terminate the program:
return 0;
}
|
Don't be worried if something else than the variable declarations themselves look a bit strange to you. Most of it will be explained in more detail in coming chapters.
Initialization
of variables
When
the variables in the example above are declared, they have an undetermined
value until they are assigned a value for the first time. But it is possible
for a variable to have a specific value from the moment it is declared. This is
called the initialization of the variable.
In
C++, there are three ways to initialize variables. They are all equivalent and
are reminiscent of the evolution of the language over the years:
The
first one, known as c-like initialization (because it is inherited from
the C language), consists of appending an equal sign followed by the value to
which the variable is initialized:
type identifier = initial_value;
For
example, to declare a variable of type int called x
and initialize it to a value of zero from the same moment it is declared, we
can write:
int
x = 0;
|
A second method, known as constructor initialization (introduced by the C++ language), encloses the initial value between parentheses (()):
type identifier (initial_value);
For example:
int
x (0);
|
Finally, a third method, known as uniform initialization, similar to the above, but using curly braces ({}) instead of parentheses (this was introduced by the revision of the C++ standard, in 2011):
type identifier {initial_value};
For example:
int
x {0};
|
All three ways of initializing variables are valid and equivalent in C++.
// initialization of variables
#include <iostream>
using namespace std;
int
main ()
{
int a=5; // initial value: 5
int b(3); // initial value: 3
int c{2}; // initial value: 2
int result; //
initial value undetermined
a = a + b;
result = a - c;
cout << result;
return 0;
}
|
Introduction
to strings
Fundamental
types represent the most basic types handled by the machines where the code may
run. But one of the major strengths of the C++ language is its rich set of
compound types, of which the fundamental types are mere building blocks.
An
example of compound type is the string class. Variables of this type are
able to store sequences of characters, such as words or sentences. A very
useful feature!
A
first difference with fundamental data types is that in order to declare and
use objects (variables) of this type, the program needs to include the header
where the type is defined within the standard library (header <string>):
// my first string
#include <iostream>
#include <string>
using namespace std;
int
main ()
{
string mystring;
mystring = "This is a string";
cout << mystring;
return 0;
}
|
Output:
This
is a string
As you can see in the previous example, strings can be
initialized with any valid string literal, just like numerical type variables
can be initialized to any valid numerical literal. As with fundamental types,
all initialization formats are valid with strings:
string mystring = "This is a
string";
string mystring ("This is a
string");
string mystring {"This is a
string"};
|
Strings can also perform all the other basic operations that
fundamental data types can, like being declared without an initial value and
change its value during execution:
// my first string
#include <iostream>
#include <string>
using namespace std;
int
main ()
{
string mystring;
mystring = "This is the initial string content";
cout << mystring << endl;
mystring = "This is a different string content";
cout << mystring << endl;
return 0;
}
|
Output:
This
is the initial string content
This is a different
string content
Note: inserting the endl manipulator ends the line (printing a newline character and flushing the stream).
Note: inserting the endl manipulator ends the line (printing a newline character and flushing the stream).
The string class is a compound type. As you can see in the
example above, compound types are used in the same way as fundamental
types: the same syntax is used to declare variables and to initialize them.
Viral Stuff and Trending News
Viral Stuff and Trending News
Subscribe to:
Posts (Atom)